Facilitator Guide
Purpose
Section titled “Purpose”This guide supports hands-on Git/GitHub onboarding for analysts, statisticians, epidemiologists, evaluators, and public health data staff.
The primary goal is confidence through repetition, not comprehensive Git knowledge. Learners may be adopting Git during high workload and reduced staffing; facilitation should reduce uncertainty, not add performance pressure.
Facilitator stance
Section titled “Facilitator stance”Use a calm, practical tone.
- Treat
git statusas the shared source of truth. - Ask “What does Git say?” before explaining what to do.
- Keep examples tied to ordinary analysis work: SQL comments, data dictionaries, findings notes, scripts, and reports.
- Use small changes so the Git workflow is the focus.
- Avoid jokes about breaking things, magical metaphors, mascots, or “Git superpowers.”
The four questions to reinforce
Section titled “The four questions to reinforce”| Question | Where learners look |
|---|---|
| What does Git know? | git status, git diff, git diff --staged |
| What does GitHub have? | repository page, branch page, pull request page |
| What changed? | diff output and PR Files changed tab |
| What happens next? | checklist step, status message, PR review state |
Use the GitHub Basics infographic as a shared visual map throughout the course. It gives learners a stable picture of where each command fits in the collaboration loop.
Recommended session structure
Section titled “Recommended session structure”Session 1 — Orientation and first commit
Section titled “Session 1 — Orientation and first commit”Time: 45–60 minutes
- Open the GitHub Basics infographic and preview the full collaboration loop.
- Explain Git vs GitHub using the local/remote model.
- Confirm everyone has Git installed.
- Confirm everyone can access GitHub.
- Clone a practice repository.
- Make one small analysis-note change.
- Run
git statusandgit difftogether. - Stage and commit the change.
- Emphasize: the commit is local until pushed.
- Push the commit if using a learner-owned repo.
Session 2 — Branches and pull requests
Section titled “Session 2 — Branches and pull requests”Time: 45–60 minutes
- Revisit the infographic and name the steps learners practiced last time.
- Start from an updated
mainbranch. - Create a new branch.
- Make a small SQL comment or data dictionary change.
- Run
git status,git diff, andgit diff --staged. - Commit and push the branch.
- Open a pull request.
- Review one another’s PRs using the Files changed tab.
- Merge the PR.
- Pull the updated
mainbranch.
Session 3 — Repetition and troubleshooting
Section titled “Session 3 — Repetition and troubleshooting”Time: 45–60 minutes
- Repeat the full workflow with a new small change.
- Practice reading
git statustogether. - Practice identifying the current branch.
- Practice updating a PR after feedback.
- Discuss safe commands and commands to ask about first.
General workflow
Section titled “General workflow”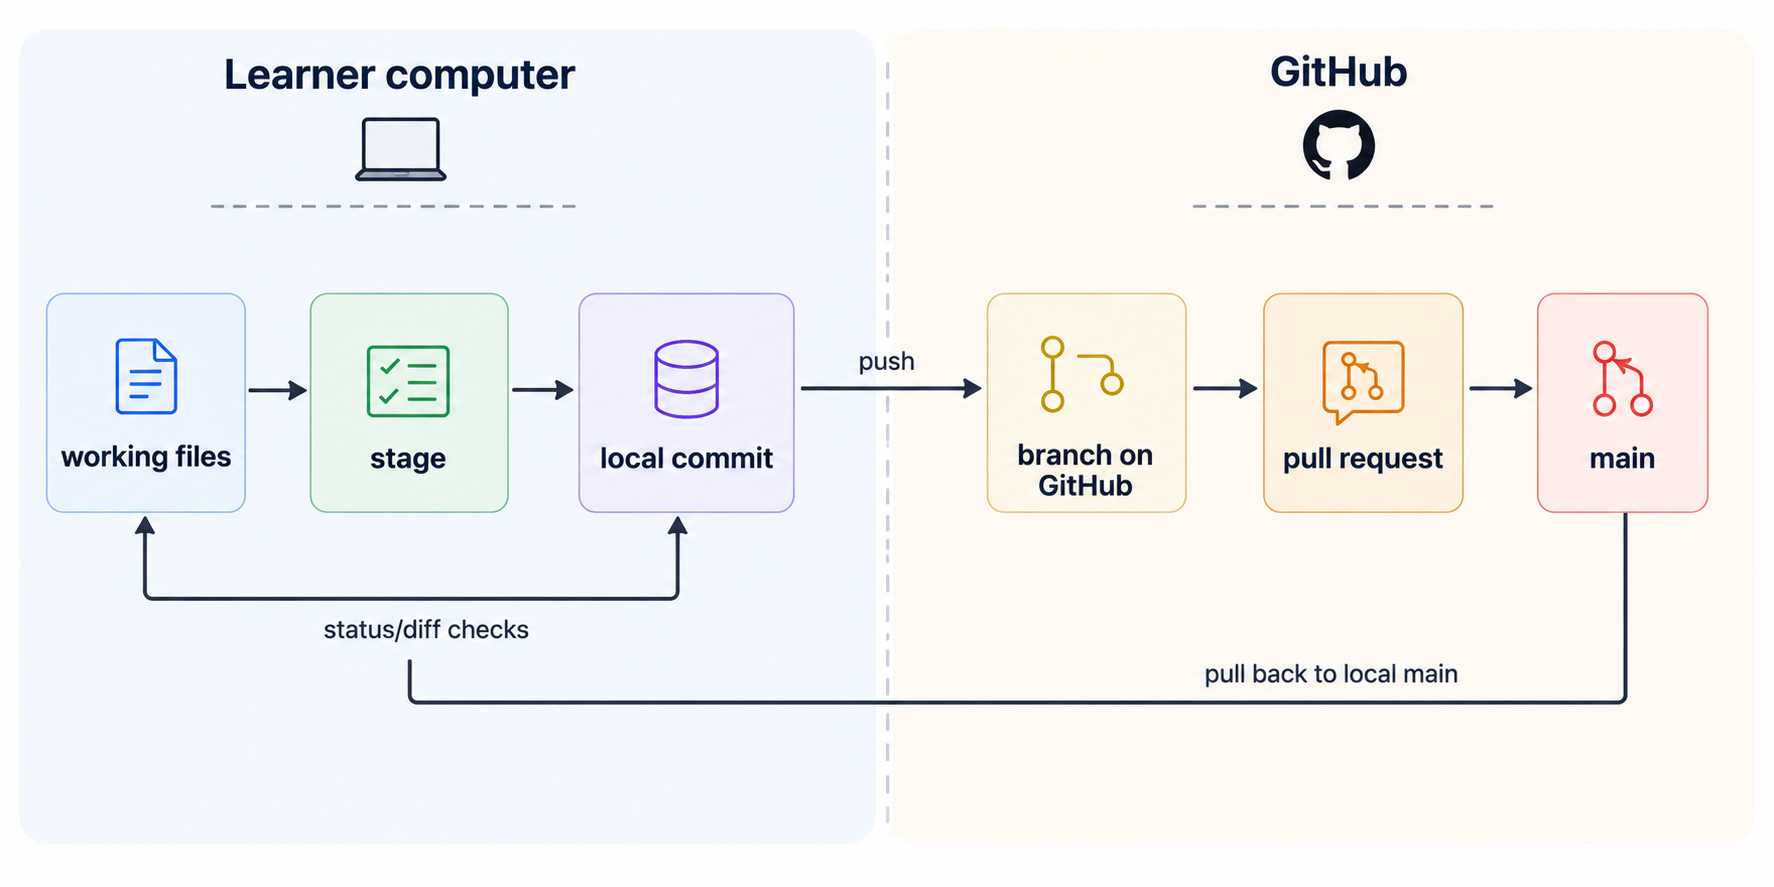
Facilitation tips
Section titled “Facilitation tips”- Have learners type the commands themselves.
- Use very small file changes.
- Pause after every command and ask: “What did Git say?”
- Normalize mistakes without dramatizing them. Most Git learning comes from recovering calmly.
- Encourage learners to run
git statuswhenever they feel uncertain. - Avoid introducing advanced topics too early.
- Do not let one fast learner set the pace for the room.
- Make time for learners to compare the terminal, GitHub, and their editor.
Common beginner sticking points
Section titled “Common beginner sticking points”Authentication problems
Section titled “Authentication problems”Symptoms:
- Git asks for a password.
- Push fails.
- GitHub says permission denied.
Response:
- Confirm the learner is logged in to GitHub.
- Confirm they have access to the repository.
- Use GitHub’s recommended authentication method for the environment.
- Avoid troubleshooting credentials in front of the full room if sensitive information may appear.
Wrong folder
Section titled “Wrong folder”Symptom:
fatal: not a git repositoryResponse:
- The learner is probably not inside the repository folder.
- Have them locate the cloned folder and
cdinto it. - Then run
git statusagain.
Wrong branch
Section titled “Wrong branch”Symptom:
- The learner made changes on
maininstead of a branch.
Response:
- Do not panic.
- Check
git status. - If changes are uncommitted, create a branch before committing:
git switch -c branch-nameor:
git checkout -b branch-nameNothing to commit
Section titled “Nothing to commit”Symptom:
nothing to commit, working tree cleanResponse:
- Git does not currently see any uncommitted file changes.
- Confirm the file was saved in the editor.
- Confirm the learner edited the expected repository.
- If a commit was just made, this message may mean the working tree is clean and the next step is push.
Push did not include my file
Section titled “Push did not include my file”Likely cause:
- The learner edited or staged a file but did not commit it.
Response:
- Re-state the model:
git pushsends commits only. - Run
git status. - If changes are unstaged or staged, review, commit, then push.
PR does not update after feedback
Section titled “PR does not update after feedback”Likely causes:
- The learner committed on a different branch.
- The learner committed locally but did not push.
Response:
- Run
git statusand check the branch name. - If the branch is ahead, run
git push. - Confirm the PR source branch matches the learner’s branch.
What not to teach on day one
Section titled “What not to teach on day one”Avoid these until learners are comfortable with the basic workflow:
- Rebase
- Cherry-pick
- Reset hard
- Force push
- Merge conflict internals
- Complex branching strategies
- Stash, unless there is a concrete need
Success criteria
Section titled “Success criteria”A learner is ready for normal beginner use when they can complete this without prompting:
pull main → create branch → edit file → status → diff → add → commit → push → open PRThey should also be able to say:
git statustells me what Git knows right now.git difftells me what changed.git commitsaves a local checkpoint.git pushsends commits to GitHub; it does not commit file changes.- A pull request is where the team reviews before merging to
main.